lunes, 9 de abril de 2018

AC frequency meter using the PIC18F2550

This project shows an AC frequency meter using tow interrupts External interrupt and TMR0 interrupt.


Note: I can teach you or help you with yours Microcontroller or FPGA projects. If you interested contact me at: 
postgraduatecahg@gmail.com


int externals_tick = 0;  // for counting the external interrupts
float frequency = 0;
float T = 0;

// LCD pins confiuration
sbit LCD_RS at RB4_bit;
sbit LCD_EN at RB5_bit;
sbit LCD_D4 at RC0_bit;
sbit LCD_D5 at RC1_bit;
sbit LCD_D6 at RC2_bit;
sbit LCD_D7 at RC6_bit;

sbit LCD_RS_Direction at TRISB4_bit;
sbit LCD_EN_Direction at TRISB5_bit;

sbit LCD_D4_Direction at TRISC0_bit;
sbit LCD_D5_Direction at TRISC1_bit;
sbit LCD_D6_Direction at TRISC2_bit;
sbit LCD_D7_Direction at TRISC6_bit;
// End LCD module connections

char txt[15];
char txt3[] = "frequency meter";
char txt4[] = "starting";


void interrupt() {

if(INTCON.TMR0IF)
{
  //PORTC.F0 = ~PORTC.F0;
  T = 32.768/externals_tick; // Tms
  frequency = (1/T)*1000;
  frequency =  frequency/2;
  FloatToStr(frequency, txt);
  INTCON.TMR0IF=0; // clear the TIMER0 interrupt
  TMR0L = 3; // this value is to perform ~32ms
  externals_tick = 0;
  T0CON.TMR0ON = 1;   // TMR0 is running now
}
else
{
    externals_tick++;
    INTCON.INT0IF=0; // clear the external interrupt
}

}

void main() {
 PORTC = 0;
 LATC = 0;
 TRISC = 0x00;

 ADCON1 = 0x0F;  // For digital configuration
 PORTB = 0;
 TRISB = 0xCF;

 Lcd_Init();                        // Initialize LCD

  Lcd_Cmd(_LCD_CLEAR);               // Clear display
  Lcd_Cmd(_LCD_CURSOR_OFF);          // Cursor off
  Lcd_Out(1,3,txt3);                 // Write text in first row
  Delay_ms(1000);
  Lcd_Cmd(_LCD_CLEAR);               // Clear display
  Delay_ms(100);
  INTCON.GIE = 1;  // global interrups are enable
  INTCON.PEIE = 1;  // pheriferical interrups.
  INTCON.INT0IE = 1; // external interrup enable
  INTCON.TMR0IE = 1; // TMR0 interrup enable

  INTCON2.INTEDG0 = 1; //1 = Interrupt on rising edge
  INTCON2.RBPU = 0;       //0= pull up
  INTCON2.TMR0IP = 1; //TMR0 Overflow Interrupt Priority bit

  T0CON.T08BIT = 1; //8 bits
  T0CON.T0CS = 0; //Timer0 Clock Source Select bit,
                 //0 = Internal instruction cycle clock (CLKO)
  T0CON.PSA = 0;  //0 = Timer0 prescaler is assigned.
                 // Timer0 clock input comes from prescaler output.
  T0CON.T0PS0 = 1; // Timer0 Prescaler Select bits
  T0CON.T0PS1 = 1; //
  T0CON.T0PS2 = 1; //
  TMR0L = 3;
  T0CON.TMR0ON = 1;   //start TMR0
  
     while(1){
     Lcd_Out(1,1,txt);
     delay_ms(100);
     }
}

sábado, 7 de abril de 2018


FPGA COURSE SYLLABUS 2018


I have the pleasure of inviting you to my FPGA course either using VHDL or Verilog.
If you are interested please contact me at:
postgraduatecahg@gmail.com

1. Introduction.

2. Design flow.
3. Types of the hardware description.
    a) Data Flow.
    b) Algorithmic design.
    c) Hierarchical design.
4. Combination design.
5. Sequential design.
6. State machines.
7. Hierarchical design (TOP Level).
8. Simulation by test- bench.
9. Design of complex circuits.
   a) UART-Bluetooth.
      a) Transmitter.
      b) Receiver.
   b) PS2.
   c) LCD.
   d) VGA.
   e) Ultrasonic sensor HC-RS04.
   f) SPI-DAC (MCP4921).
   g) FPU (floating point unit IEEE 754).
10) Implementation of artificial neural networks.
       a) Design of the neural network.
       b) Implementation using floating point.
       c) Implementation of the sigmoid function.


Also, you can make a registration at:
https://docs.google.com/forms/d/e/1FAIpQLSfdZts2LMiqPP9xhmGjb9xaCt5hWpJsIQajFECTVrmL0w4O0Q/viewform?usp=sf_link

viernes, 6 de abril de 2018


Mealy finite state machine implemented in VHDL


In this sample the I implement the Mealy finite state machine using VHDL.
It is important to keep in mind that in the Mealy machine the output depends on the states and the inputs, in this case, the input a (see figure 2).
Finally, this post is based on the book Digital design and computer architecture by David Harris.
  
Remember that I can teach you on linea or help you in your projects as a consultant.
if you interested ask to:
postgraduatecahg@gmail.com 


Figure 1. State flow diagram.


library IEEE;
use IEEE.STD_LOGIC_1164.ALL;
entity mealy is
port(clk, reset: in std_logic;
a: in std_logic;
y: out std_logic);
end mealy;
architecture Behavioral of mealy is
type statetype is (S0, S1, S2, S3);
signal state, nextstate: statetype;
begin
-- state register
process (clk, reset)begin
  if reset = '1' then
  state <=S0;
  elsif clk'event and clk='1' then
  state <= nextstate;
  end if;
end process;
-- next state logic
process (state, a) begin
  case state is
  when S0 =>
  if a = '1' then
  nextstate <= S1;
  else
  nextstate <= S0;
  end if;
 
  when S1 =>
  if a = '1' then
  nextstate <= S2;
  else
  nextstate <= S0;
  end if;
 
  when S2 =>
  if a = '1' then
  nextstate <= S2;
  else
  nextstate <= S3;
  end if;
 
  when S3 =>
  if a = '1' then
  nextstate <= S1;
  else
  nextstate <= S0;
  end if;
 
  when others => nextstate <= S0;
  end case;
end process;
-- Output logic
y <= '1' when (a='1' and state = S3) else '0';
end Behavioral;


Figure 2. RTL of the Mealy FSM.


Figure 3. Simulation of Mealy FSM.


The finite state machine in VHDL

In this sample, I show how to implement a finite state machine.
In the code, an asynchronous reset is implemented first. After that tow logic parts are implemented, the first logic part is for flow program or in other words the flow of state. The second logic part is for output logic.
Finally is important to know that key part is type statetype which states the implementation of the state machine.

Please remember that I can teach or solve your problems as a consultant:
postgraduatecahg@gmail.com


library IEEE;
use IEEE.STD_LOGIC_1164.ALL;
entity FSM1 is
port(
clk, reset: in std_logic;
y: out std_logic);
end FSM1;
architecture Behavioral of FSM1 is
type statetype is (S0, S1, S2);
signal state, nextstate: statetype;
-- state register part
begin
process (clk, reset) begin
  if (reset='1') then
  state <= S0;
  elsif (clk'event and clk='1') then
  state <= nextstate;
  end if;
end process;
-- Next state logic
  nextstate <= S1 when state = S0 else
     S2 when state = S1 else
     S0;
-- Output logic
y <= '1' when state = S0 else '0';

end Behavioral;


Bluetooth HC05 using VHDL


In this post, I show the architecture of the RS-232 driver for the Bluetooth module HC05 which is set to work at 9600 bits/second. 

If you interested in the VHDL code its price is 10 USD. So please contact me to:postgraduatecahg@gmail.com


miércoles, 28 de marzo de 2018


The problem form Computer Engineering Department from Iraq using VHDL


A solution of problem #1:
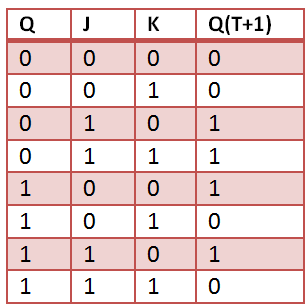
First, we have to design the flip-flop JK as is shown in figures 1 and 2. 
After that, we have to design and connect the components with the flip-flop.

JK Flip Flop


Figure 1. True table.

library IEEE;
use IEEE.STD_LOGIC_1164.ALL;
entity JK_Flop is
    Port ( J : in  STD_LOGIC;
           K : in  STD_LOGIC;
           clk : in  STD_LOGIC;
           Q : out  STD_LOGIC;
           QN : out  STD_LOGIC);
end JK_Flop;
architecture Behavioral of JK_Flop is
signal data: std_logic :='0';
Begin
process (clk, J, K) begin
  if (clk'event and clk = '1') then
    if(J='0' and K='0')then
    data <= data;
    elsif (J='1' and K='1')then
    data<= not data;
    elsif (J='0' and K='1')then
    data<= '0';
    else
    data<='1';
    end if;
  end if;
  end process;
  Q <= data;
  QN <= not data;

end Behavioral;


Figure 2. Flip-flop JK simulation.


Second:
The solution of problem #1 by top-level design.

------------------------------------------------------------------------------------------------------------------
library IEEE;
use IEEE.STD_LOGIC_1164.ALL;

entity top_desing_1 is 

port (
RA: in std_logic;
RB: in std_logic;
clk: in std_logic;
EA, EB: out std_logic
);
end top_desing_1;

architecture Behavioral of top_desing_1 is


COMPONENT JK_Flop

PORT(
J : IN std_logic;
K : IN std_logic;
clk : IN std_logic;          
Q : OUT std_logic;
QN : OUT std_logic
);
END COMPONENT;

signal not_RA: std_logic;

signal not_RA_and_RB: std_logic;
signal not_RB: std_logic;
signal noty1: std_logic;

signal RA_or_RB: std_logic;

signal not_RA_and_not_RB: std_logic;
signal y2: std_logic;
signal not_y2: std_logic;

begin


not_RA_and_RB <= not_RA and RB;

not_RB <= not RB;

Inst_JK_Flop: JK_Flop PORT MAP(

not_RA_and_RB,--J
not_RB,--K
clk,
EB,--Q
noty1--QN 
);

not_RA <= not RA;
not_RB <= not RB;
RA_or_RB <= RA or RB;
not_RA_and_not_RB <= not_RA and not_RB;

Inst_JK_Flop2: JK_Flop PORT MAP(

RA_or_RB,--J
not_RA_and_not_RB,--K
clk,
y2,--Q
not_y2--QN 
);

EA <= noty1 and y2;


end Behavioral;


------------------------------------------------------------------------------------------------------------------
The solution by the RTL schematic is shown in figure 3.


Figure 3. RTL top design of problem1.

viernes, 23 de marzo de 2018


Shift register with a parallel load in VHDL


This program implements a shift register in VHDL. The register can be load with 8 bits which represents the data to be transmitted and the others bits that are attached to the data represent a protocol in this case the protocol is the RS-232.
Note: the most important line is :
reg <= reg(N-2 downto 0) & din; 
Where the & operand is to shift. It means that every clock the register content is going to shift to the left.
Figure 1 is the RTL circuit, figure 2 is the design at view technology schematic level. Finally, figure 3 is the testbench simulation of the code.


Figure 1. Shift register RTL


library IEEE;
use IEEE.STD_LOGIC_1164.ALL;

entity shift_reg is
generic (N: integer := 12);
port ( clk, din, load: in std_logic;
data: in std_logic_vector(7 downto 0);
dout: out std_logic);
end shift_reg;

architecture Behavioral of shift_reg is

signal reg: std_logic_vector(N-1 downto 0):="100000000011";

begin
process(clk)begin
if clk'event and clk='1' then
if load = '1' then 
reg <= "10" & data & "11"; 
else
reg <= reg(N-2 downto 0) & din; 
end if;
end if;
end process;

dout <= reg(N-1);
end Behavioral;


Figure 2. View technology schematic.

Testbench


LIBRARY ieee;
USE ieee.std_logic_1164.ALL;

ENTITY shifth_reg_tb IS
END shifth_reg_tb;

ARCHITECTURE behavior OF shifth_reg_tb IS 

    -- Component Declaration for the Unit Under Test (UUT)

    COMPONENT shift_reg
    PORT(
         clk : IN  std_logic;
         din : IN  std_logic;
         load : IN  std_logic;
         data : IN  std_logic_vector(7 downto 0);
         dout : OUT  std_logic
        );
    END COMPONENT;
    

   --Inputs
   signal clk : std_logic := '0';
   signal din : std_logic := '0';
   signal load : std_logic := '0';
   signal data : std_logic_vector(7 downto 0) := (others => '0');

  --Outputs
   signal dout : std_logic;

   -- Clock period definitions
   constant clk_period : time := 20 ns;

BEGIN

-- Instantiate the Unit Under Test (UUT)
   uut: shift_reg PORT MAP (
          clk => clk,
          din => din,
          load => load,
          data => data,
          dout => dout
        );

   -- Clock process definitions
   clk_process :process
   begin
clk <= '1';
wait for clk_period/2;
clk <= '0';
wait for clk_period/2;
   end process;

process 
begin
load <= '1';
wait for clk_period;
load <= '0';
wait for clk_period*15;
end process;


data <= "11001100", "00001111" after 300 ns;
din <= '1' , '1' after 1000 ns;
END;


Figure 3. Testbench simulation.

BTFSS INSTRUCTION  IN ASSEMBLER FOR PIC18F In this sample, we show that how to use a switch input to make an action. Remember that I...